The TripFlow MVP is now fully functional, combining a robust backend, an interactive frontend, automated testing, CI/CD pipelines, and Dockerized deployment.
This milestone brings our travel planning PWA closer to production readiness, and makes it easy for others to run, test, and explore the app.
🏗️ Architecture Overview
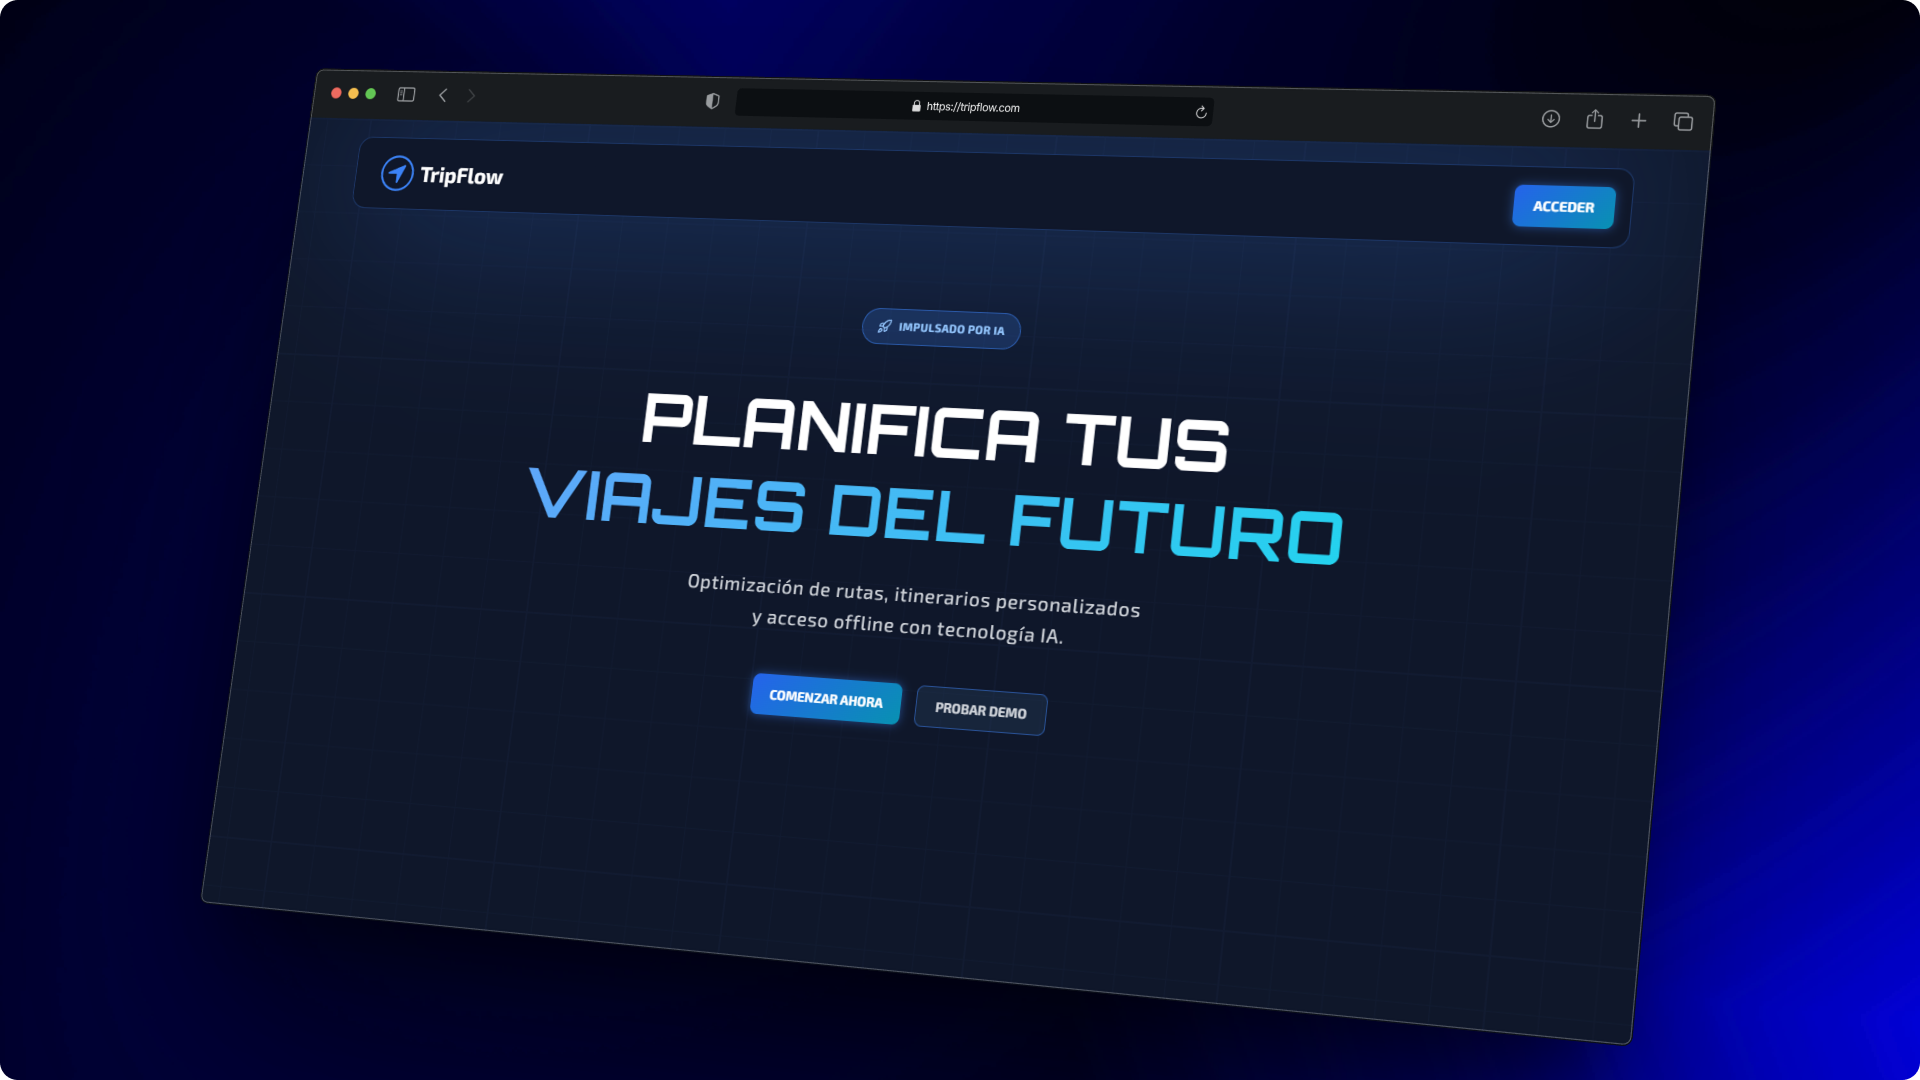
TripFlow follows a client-server architecture with a React frontend and a Spring Boot backend, connected via RESTful APIs. The entire stack is containerized using Docker for easy deployment and consistency across environments.
Here’s a high-level overview of the architecture:
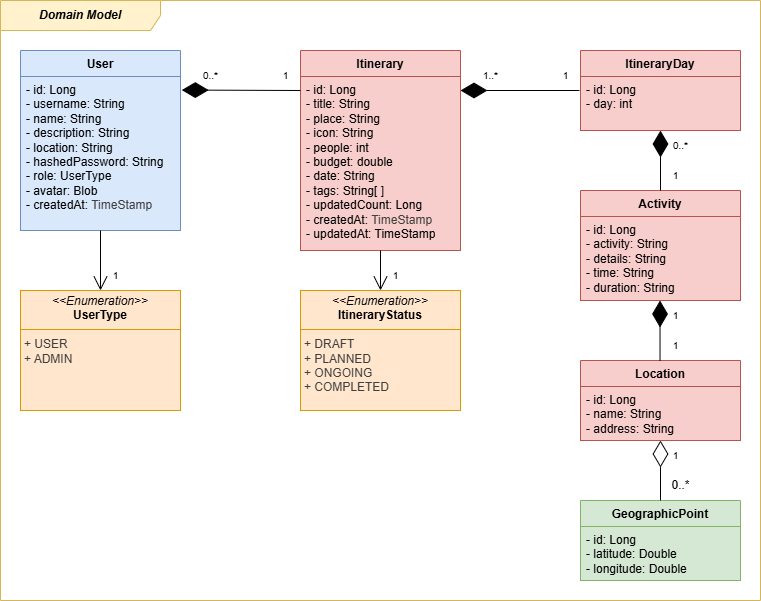
💈 Domain Model Overview
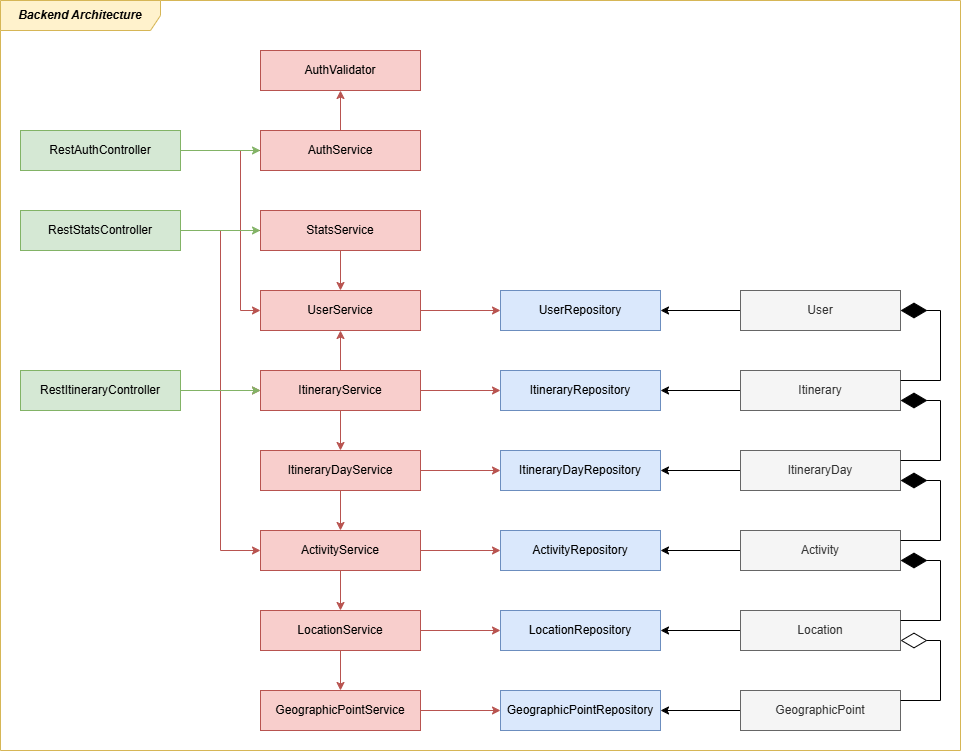
💻 Server Architecture Overview
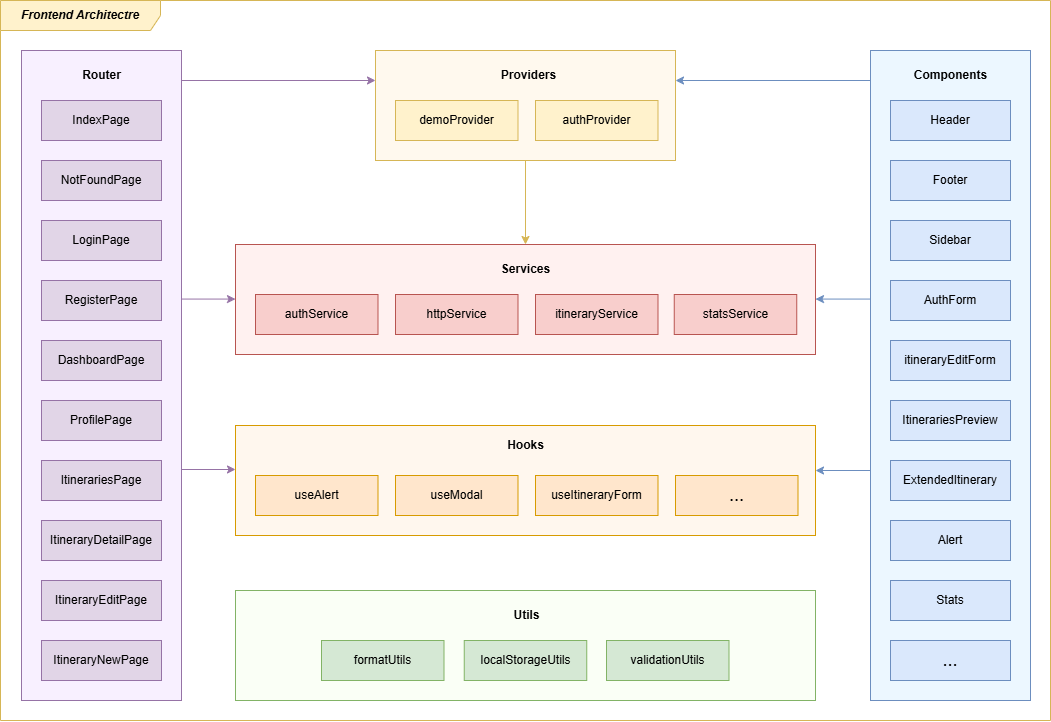
🌐 Client Architecture Overview
🌱 Demo Mode for Quick Testing
TripFlow includes a demo mode that allows users to explore the app without registering. This is perfect for demos, workshops, or new users who want to test the core features quickly without the friction of creating an account.
In demo mode, users can:
- Browse and create itineraries
- Explore the interface and navigation
- Interact with core functionalities such as activities, days, and itinerary details
🧪 Testing: Full Stack Examples
Testing ensures reliability and confidence in deployment:
- ✅ Unit tests – backend services & frontend components
- 🔗 Integration tests – services communicating with real components
- 🎭 E2E tests – Playwright simulates full user interactions
📖 Backend Integration Example
Here’s an example of an integration test for itinerary creation using RestAssured:
@Test
@DisplayName("Test successful itinerary creation")
public void testCreateItinerarySuccess() {
    String authToken = AuthTestUtils.authenticateUserAndGetToken("user");
    ExtendedItineraryDTO itineraryDTO = createTestItinerary();

    RestAssured
    .given()
        .contentType(ContentType.JSON)
        .cookie("auth_token", authToken)
        .body(itineraryDTO)
    .when()
        .post("/v1/itineraries")
    .then()
        .statusCode(201)
        .body("place", equalTo(itineraryDTO.place()))
        .body("id", notNullValue())
        .body("days", hasSize(1))
        .body("days[0].activities", hasSize(1))
        .body("days[0].activities[0].activity", equalTo(
            itineraryDTO.days().get(0).activities().get(0).activity()
        ));
}
💡 Why this matters
This test ensures that the backend correctly handles authenticated requests, persists the itinerary, and returns the expected response structure.
📖 Frontend E2E Example
For full stack validation, here’s a Playwright E2E test that creates a new itinerary via the UI:
test("should successfully create a new itinerary with basic info", async ({ page }) => {
    await page.goto(`${FRONTEND_URL}/itineraries/new`);

    await page.getByLabel(/título del viaje/i).fill("Escapada a Barcelona");
    await page.getByLabel(/destino/i).fill("Barcelona, España");
    await page.getByLabel(/número de viajeros/i).fill("2");
    await page.getByLabel(/presupuesto/i).fill("1500");
    await page.getByLabel(/fecha de inicio/i).fill("2025-12-01");

    await page.getByRole("button", { name: /guardar todo/i }).click();

    await expect(page).toHaveURL(/\/itineraries/, { timeout: 10000 });
    await expect(page.getByText(/barcelona/i)).toBeVisible();
});
🔍 Key point
This test simulates a real user creating an itinerary, verifying that the frontend form, API interaction, and UI update all work together.
🚀 CI/CD Pipelines
To ensure code quality, stability, and a smooth deployment process, TripFlow leverages GitHub Actions to implement both E2E testing and reusable CD pipelines.
✅ E2E Pipeline: CI - E2E Tests
This pipeline runs end-to-end tests using Playwright, simulating real user interactions with the full stack (frontend + backend + database). It is triggered:
- On
pushevents tomainanddevelopbranches - On pull requests targeting
main - Manually via
workflow_dispatch
Key steps of the pipeline:
- Checkout code – pulls the latest code from the repository.
- Setup Node.js – prepares the environment with the LTS Node version required by frontend and Playwright tests.
- Setup Docker Compose – ensures Docker is ready to run multi-container services.
- Start services – launches the backend, frontend, and PostgreSQL containers using
docker-compose.test.yaml. - Wait for services to be healthy – ensures that all containers are fully up before running tests, using a custom shell script.
- Install E2E dependencies – installs Node modules in the
e2efolder. - Install Playwright browsers – downloads necessary browsers for automated UI testing.
- Run Playwright tests – executes all end-to-end tests, verifying that the app behaves correctly from the user’s perspective.
name: CI - E2E Tests
on:
  push:
    branches: [main, develop]
    paths: ['backend/**','frontend/**','e2e/**','.github/workflows/ci-e2e-tests.yaml']
  pull_request:
    branches: [main]
    paths: ['backend/**','frontend/**','e2e/**','.github/workflows/ci-e2e-tests.yaml']
  workflow_dispatch:

jobs:
  e2e-testing:
    timeout-minutes: 60
    runs-on: ubuntu-latest
    steps:
      - uses: actions/checkout@v4
      - uses: actions/setup-node@v4
        with: node-version: lts/*
      - uses: docker/setup-compose-action@v1
        with: version: latest
      - name: Start services
        working-directory: ./docker
        run: docker compose -f docker-compose.test.yaml up -d
      - name: Wait for services
        working-directory: ./scripts
        run: |
          chmod +x run-wait-for-services.sh
          ./run-wait-for-services.sh
      - name: Install E2E dependencies
        working-directory: ./e2e
        run: npm ci
      - name: Install Playwright Browsers
        working-directory: ./e2e
        run: npx playwright install --with-deps
      - name: Run Playwright tests
        working-directory: ./e2e
        run: npx playwright test
💡 Why it matters
This pipeline guarantees that any change in backend or frontend won’t break the user experience. It acts as a final check before merging features or deploying to production.
📦 Reusable CD Pipeline: CD - Build and Publish OCI Artifacts
The continuous deployment (CD) pipeline automates building and publishing Docker images for all TripFlow services, making them reusable across environments (dev, test, prod).
Key features:
-
Workflow inputs:
tag: version tag for Docker imagescompose_file: docker-compose file to push as OCI artifactservices: list of services to build (frontend, backend, etc.)
-
Matrix strategy:
- Allows building multiple services in parallel.
-
Steps explained:
- Checkout code – pulls the latest repository snapshot.
- Docker login – authenticates to Docker Hub using secrets.
- Build & push images – builds each service’s Dockerfile and pushes it to Docker Hub with the specified tag.
- Publish docker-compose – the first service pushes the docker-compose.yml as an OCI artifact, making it reusable by other workflows.
name: CD - Build and Publish OCI Artifacts

on:
  workflow_call:
    inputs:
      tag:
        required: true
        type: string
      compose_file:
        required: true
        type: string
      services:
        required: true
        type: string

jobs:
  build-and-push:
    runs-on: ubuntu-latest
    strategy:
      matrix:
        service: ${{ fromJSON(inputs.services) }}

    steps:
      - uses: actions/checkout@v4

      - name: Log in to DockerHub
        uses: docker/login-action@v3
        with:
          username: ${{ secrets.DOCKERHUB_USERNAME }}
          password: ${{ secrets.DOCKERHUB_TOKEN }}

      - name: Compute image name suffix
        run: |
          # basename: backend/**-service -> **-service
          IMAGE_SUFFIX=$(basename "${{ matrix.service }}")
          # sanitize: to lowercase, replace underscores/slashes with hyphens
          IMAGE_SUFFIX=$(echo "$IMAGE_SUFFIX" | tr '[:upper:]' '[:lower:]' | tr '_/' '-')
          echo "IMAGE_SUFFIX=$IMAGE_SUFFIX" >> $GITHUB_ENV

      - name: Build and push ${{ matrix.service }}
        uses: docker/build-push-action@v6
        with:
          context: ${{ startsWith(matrix.service, 'frontend') && './frontend' || './backend' }}
          file: ./${{ matrix.service }}/Dockerfile
          push: true
          tags: docker.io/${{ secrets.DOCKERHUB_USERNAME }}/tripflow-${{ env.IMAGE_SUFFIX }}:${{ inputs.tag }}

      - name: Publish docker-compose as OCI artifact
        if: ${{ matrix.service == fromJSON(inputs.services)[0] }}
        run: |
          cp ${{ inputs.compose_file }} docker-compose.yml
          docker compose publish -y ${{ secrets.DOCKERHUB_USERNAME }}/tripflow-compose:${{ inputs.tag }}
🐳 Dockerization: Full Stack in One Compose
TripFlow can be launched fully using Docker Compose, which orchestrates all services (frontend, backend, database) in isolated containers, ensuring consistency across environments.
services:
  postgres:
    image: postgres:15-alpine
    container_name: tripflow-postgres-db
    restart: unless-stopped
    environment:
      POSTGRES_DB: tripflow
      POSTGRES_USER: tripflow_user
      POSTGRES_PASSWORD: secure_password
    ports: ["5432:5432"]
    volumes: [pgdata:/var/lib/postgresql/data]
    healthcheck:
      test: ["CMD-SHELL", "pg_isready -U tripflow_user -d tripflow"]
      interval: 10s
      timeout: 5s
      retries: 5
    networks: [tripflow-network]

  backend:
    image: cub1z/tripflow-backend:0.1
    container_name: tripflow-backend
    restart: unless-stopped
    environment:
      SPRING_PROFILES_ACTIVE: prod
      POSTGRES_URL: jdbc:postgresql://postgres:5432/tripflow
      POSTGRES_USER: tripflow_user
      POSTGRES_PASSWORD: secure_password
      JWT_SECRET: VGhpcyBpcyBhIHZlcnkgc2VjdXJlIGRldmVsb3BtZW50IHNlY3JldCEyMw==
    ports: ["8080:8080"]
    depends_on:
      postgres:
        condition: service_healthy
    healthcheck:
      test: ["CMD-SHELL", "wget --no-verbose --tries=1 --spider http://localhost:8080/api/health || exit 1"]
      interval: 30s
      timeout: 10s
      retries: 3
    networks: [tripflow-network]

  frontend:
    image: cub1z/tripflow-frontend:0.1
    container_name: tripflow-frontend
    restart: unless-stopped
    environment:
      PUBLIC_API_BASE_URL: http://localhost:8080
    ports: ["4173:4173"]
    depends_on:
      backend:
        condition: service_healthy
    healthcheck:
      test: ["CMD-SHELL", "wget --no-verbose --tries=1 --spider http://localhost:4173/ || exit 1"]
      interval: 30s
      timeout: 10s
      retries: 5

volumes:
  pgdata:
    driver: local

networks:
  tripflow-network:
    driver: bridge
✅ Why this setup adds value
-
Full stack reproducibility All developers, testers, and CI environments can run the same containers without worrying about differences in local machines or OS-specific issues.
-
Robust startup via healthchecks
- PostgreSQL: ensures database is ready before backend starts (pg_isready)
- Backend: waits until
/api/healthresponds - Frontend: waits until the app is fully accessible This guarantees that services only start when dependencies are ready, preventing race conditions and startup failures.
-
Persistent PostgreSQL data
- The
pgdatavolume keeps database data across container restarts. Developers can stop/start containers without losing test or development data.
- The
-
Configurable environments
- Environment variables like
SPRING_PROFILES_ACTIVE,POSTGRES_URL, andJWT_SECRETmake it easy to switch between dev, test, and prod configurations. - No code changes are required to adapt to different environments.
- Environment variables like
-
Dedicated internal network
tripflow-networkisolates the services from the host network.- Services communicate internally using container hostnames (e.g.,
postgres), improving security and avoiding port conflicts.
-
Ease of scaling
- Additional services (like caching, queueing, or analytics) can be added without disrupting the existing stack.
- Containers can be scaled individually in production or test environments.
-
CI/CD integration ready
- The same Docker Compose file can be used in GitHub Actions pipelines for E2E testing.
- Makes automated tests consistent with the development environment.
💡 Tip for readers
Use
docker-compose.override.ymlto define environment-specific tweaks, such as different database credentials or backend URLs, without touching the main Compose file. This keeps your setup clean and maintainable.
📄 API Documentation
All TripFlow endpoints are fully documented using OpenAPI, providing an interactive HTML documentation for developers:
Perfect for exploring the API and integrating with other tools.
📖 How API Endpoints are Documented in Java
TripFlow uses Springdoc OpenAPI annotations to generate documentation directly from Java controllers.
For example, the createItinerary endpoint is annotated as follows:
@PostMapping({"", "/"})
@Operation(
    summary = "Create Itinerary",
    description = "Creates a new itinerary for the authenticated user.",
    security = @SecurityRequirement(name = "auth_token")
)
@ApiResponses({
    @ApiResponse(responseCode = "201", description = "Itinerary created successfully"),
    @ApiResponse(responseCode = "400", description = "Invalid itinerary data provided"),
    @ApiResponse(responseCode = "401", description = "Unauthorized access")
})
public ResponseEntity<ExtendedItineraryDTO> createItinerary(@RequestBody ExtendedItineraryDTO itineraryDTO) {
    try {
        ExtendedItineraryDTO createdItinerary = this.itineraryService.createItinerary(itineraryDTO);
        URI location = ServletUriComponentsBuilder.fromCurrentRequest().path("/{id}")
            .buildAndExpand(createdItinerary.id()).toUri();

        return ResponseEntity.created(location).body(createdItinerary);
    } catch (Exception e) {
        return ResponseEntity.badRequest().build();
    }
}
Key Points
@Operation– provides a summary, detailed description, and security requirements.@ApiResponses– defines all possible HTTP responses for the endpoint with descriptions.- Automatic HTML generation – Springdoc reads these annotations and produces the OpenAPI documentation, keeping it always in sync with the code.
- Developer-friendly – anyone can see request/response schemas, authentication requirements, and example responses without reading the code.
💡 Tip
Documenting directly in the controller ensures the API docs evolve naturally with your code, reducing outdated documentation and improving maintainability.
🌱 What’s Next
During the next phase, TripFlow is gearing up for v0.2.0 with ambitious upgrades that will make the app smarter, faster, and more interactive. Core features will be enhanced, tests updated, and the foundation laid for a fully functional, AI-powered travel planning PWA — follow along to see the progress!
- 🤖 AI-powered itinerary generation
- 🖼️ User avatars and profile pictures
- 🔔 Notifications and alerts system
- 👥 Admin panel for user and system management
- 🏗️ Transition to a microservices architecture with Kafka
- 🎓 Unsplash API integration